This week I am making a Pendant using a handmade glass cabochon, a pendant finding, seed beads and Crystal Clay.
For those who do not know what a cabochon is, it is a bead that has a flat back and does not have holes in the bead. They come in many different materials such as stone, glass and crystal and in a variety of shapes.
In this project I am using a lamp worked glass cabochon that I made by melting glass in a torch onto a cabochon mandrel coated with bead release. The bead release does just as it sounds, it releases the glass from the mandrel after it has slowly cooled in a kiln. The cooling process is called annealing and is done in a kiln with a digital controller to bring the glass down from melting temperatures to 740 degrees, it then holds the temperature at 740 for at least 30 minutes before it begins to slowly ramp down to room temperature. This usually happens over night and the beads are ready to be cleaned and inspected the following day. Glass cabochons can be purchased from
Half Moon Beads. Stone, metal or crystal cabochons can be used as well.
Preparing Crystal Clay
The first step is to mix equal parts of part A (color) and part B (hardener) of Crystal Clay until it is thoroughly combined making sure that there are no streaks of one color in the clay.

Next, I roll the mixed clay into an oval shaped ball and place it into the bezel setting, spreading it out. If clay accidentally gets pushed beyond the bezel setting, it's easy to move it back into place by pushing it with your fingers.

The inside bezel should now be covered with Crystal Clay. Smooth out the clay until it is evenly distributed throughout the bezel and there are no lumps in it.

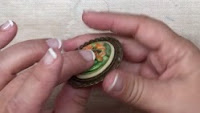
The next step is to push the cabochon into the clay until the clay pushes out around the cabochon. This will help keep the cabochon in the clay after it is dry.
Circling Cabochon with Seed Beads
Now it's time to add seed beads around the cabochon, covering up the clay.
First string seed beads onto beading thread using a beading needle until you have enough to go around the outside of the cabochon.

Before tying the thread, measure around the cabochon with seed beads to make sure the beads will completely cover around the cabochon. Add or remove seed beads as needed.

Sew through the beads with the beading thread until you reach the tail to create a circle.
Tie a knot in the thread using a surgeon's knot.

Push the circle of seed beads into the Crystal Clay around the cabochon, until they are securely embedded into the clay.
Cut the excess thread and clean up any displaced clay using a dental tool or toothpick.