Showing posts with label pendant. Show all posts

Tuesday, June 2, 2015

Swarovski Crystal Slide Pendant


Happy Tuesday everyone! 

Today I am making a Swarovski Crystal Slide Pendant. These pendants are made with Filigree Loop Findings from Eclectica Beads located in Brookfield, Illinois. I came across their beading kits while attending the Bead and Button Show a few years ago. They also have an online store where you can purchase the findings for this project.


For diamond shaped pendant you'll need:

  • 40 - 4 mm Swarovski Bicone Crystals (8 of each color you would like to use)
  • 6 Filigree Loop Findings
  • 28 gauge tarnish free wire
  • 1 flat nose pliers
  • 1 wire cutter


Cut approximately 24" of wire from your spool. String on 1 filigree loop finding, a 4 mm Swarovski crystal, alternating the finding with a crystal between as shown to the left. Both ends will end with the filigree findings.

Now for the next row, beginning with the darkest crystal end, feed the wire back through the end finding, add a dark crystal and then through the next finding. Continue until you reach the other end of the pendant.


Continue in this manner until you have added all of the Swarovski crystals all the way around the pendant.
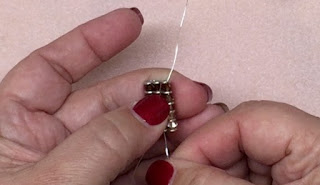


To finish off the pendant, string the wire back through the next row of findings/crystals.

Next, feed the wire back through the center of the pendant and out between the end crystal. Pull the wire tight.


Snip the wire with wire cutters or shears as close to the pendant as possible. If needed, push the wire back into the center of the pendant.


String onto your favorite chain or cord.


To watch me make this pendant, check out the video below.


Thank you for visiting! Below, please find links to supplies I used in this project. If you have any questions or comments, please leave them below or send me an e-mail on the "Contact Us" tab above.

Have a crafty week!


Monday, June 1, 2015

Update and Sneak Peek for tomorrow

Update: You might have noticed that I had missed a few weeks, I apologize but have good reasons.

For Mother's Day, my family and I went to San Antonio, Texas to surprise my mother-in-law (MIL) for Mother's Day. Boy was she surprised!

The plan was for my sister-in-law to take my MIL out to lunch for Mother's Day. But when they arrived, my husband was waiting with the restaurant door open. At first she wasn't sure that it was her son at the door, but once she saw him she was nearly in tears. She told us it was the best Mother's Day gift should could have received. It sure makes me happy to make her happy.

When we returned home, we hit the ground running. My family is of Portuguese decent, each year, six weeks after Easter, we celebrate a Portuguese Holy Ghost Festa. You can read more about the tradition here. My family has been involved in this tradition since coming to the U.S. four generations ago.

I decorate the chapel on the Saturday before the event (See the photo to the left) by making bouquets of flowers, placing cloths over the alter and positioning religious statues.


Then on Sunday,  volunteer in the outdoor auction to help raise money so that the buildings can be maintained, cover cost of the next year's celebration, etc. It's a long weekend and a lot of work, but part of my heritage I'm very proud of.  In the photo on the right, my long time, dear friend Brenda (R) and I (L) are holding up a handmade quilt being auctioned.  Brenda and I have been friends since the 5th grade. Our moms were friends and we did everything together.

Unfortunately after both of those events, I got a cold that turned into bronchitis. I'm still recovering from the last few symptoms but I feel 95% better.

Sneak Peek for Tuesday, June 2, 2015

Please join me again tomorrow when I will be making Swarovski Crystal Slide Pendants. Here is a sneak peak at the finished pendants. They're a lot easier than they look and get a lot of compliments.

Have a great Monday and I'll see you soon!


Tuesday, May 5, 2015

Cabochon Pendant

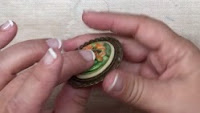
This week I am making a Pendant using a handmade glass cabochon, a pendant finding, seed beads and Crystal Clay.

For those who do not know what a cabochon is, it is a bead that has a flat back and does not have holes in the bead. They come in many different materials such as stone, glass and crystal and in a variety of shapes.

In this project I am using a lamp worked glass cabochon that I made by melting glass in a torch onto a cabochon mandrel coated with bead release. The bead release does just as it sounds, it releases the glass from the mandrel after it has slowly cooled in a kiln. The cooling process is called annealing and is done in a kiln with a digital controller to bring the glass down from melting temperatures to 740 degrees, it then holds the temperature at 740 for at least 30 minutes before it begins to slowly ramp down to room temperature. This usually happens over night and the beads are ready to be cleaned and inspected the following day. Glass cabochons can be purchased from Half Moon Beads. Stone, metal or crystal cabochons can be used as well.

Preparing Crystal Clay

The first step is to mix equal parts of part A (color) and part B (hardener) of Crystal Clay until it is thoroughly combined making sure that there are no streaks of one color in the clay.


Next, I roll the mixed clay into an oval shaped ball and place it into the bezel setting, spreading it out. If clay accidentally gets pushed beyond the bezel setting, it's easy to move it back into place by pushing it with your fingers.


The inside bezel should now be covered with Crystal Clay. Smooth out the clay until it is evenly distributed throughout the bezel and there are no lumps in it.


The next step is to push the cabochon into the clay until the clay pushes out around the cabochon. This will help keep the cabochon in the clay after it is dry.


Circling Cabochon with Seed Beads

Now it's time to add seed beads around the cabochon, covering up the clay.

First string seed beads onto beading thread using a beading needle until you have enough to go around the outside of the cabochon.


Before tying the thread, measure around the cabochon with seed beads to make sure the beads will completely cover around the cabochon. Add or remove seed beads as needed.


Sew through the beads with the beading thread until you reach the tail to create a circle.

Tie a knot in the thread using a surgeon's knot.


Push the circle of seed beads into the Crystal Clay around the cabochon, until they are securely embedded into the clay.


Cut the excess thread and clean up any displaced clay using a dental tool or toothpick.